Tuesday, 11 September 2012

Rimmel London- Black Out

Hey guys how are you? I've had a big day today and thought why not share my story with you. My friend and I were waiting at a bus stop for another friend of ours. She rang and told us she was going to be an hour late. So I decided to go to maccas(McDonalds). Maccas was basically a 2 minute walk or the next bus stop. My friend suggested to catch a bus as she was too lazy. 5 minutes later we can see a bus driving up to us, this lady came up to us and asked if that bus goes to top ryde. So what did we say? We said yes.  Basically every bus that stopped at this stop when straight ahead and we were pretty sure it would take us to the next stop. We fully walked into the bus with such style like we owned the bus. My friend pushed me over and said " move I wanna get comfortable". As soon as the bus started it turned into a completely random street, this bus didn't even take us one stop ahead. Instead of freaking out me and my friend start cracking up for 10 minutes while everyone on the bus looked at us weirdly. We finally figured it was best to press the button. We were just about the get off the bus when I turned around and saw that lady we helped, she looked so scared and nervous because she took advice from people who were totally lost themselves. Who knows if that lady ever got to top ryde? After getting off the bus, we were completely lost and had no idea where we were. So what do we do? We laugh, in the middle of the street we are laughing for 10 minutes and at one point I was crying because I laughed to much. We practically made everyone on the bus laugh too, lol. We decided to find our way back which took 30 minutes back to the first bus stop and finally our friend arrived. We did all of that for no reason, plus I broke a nail but it was totally worth it(I would never say such a thing but today was such a hilarious day that I had to say it). So in my next posts my nails will be shorter

Today I have a swatch for Rimmel London Black Out. Black out is the perfect black with high shine. This was from the 60 second collection although I felt it wasn't 60 second, it was more like 3-5 minutes to dry which is disappointing since their other 60 sec polishes dry super fast. Mine was also a little goppy and thick, not too much but a little. Maybe I purchased a old one or something so I can't clearly be sure.
Two coats is seen in the pictures. They all dried streak free so that was great and I quite like it. Although it didn't dry in 60 seconds, that didnt really bother me. The fact it was slightly thick and I mean a small bit thick, applying was still easy. So overall I'm pretty happy with this polish.

OPI- I Have A Herring Problem

So I've had this saved for about 8 months and forgot to post it. So that's what I'm doing now. This is OPI's I Have A Herring Problem. This polish is quite sheer and required three coats to get this look but the formula was amazing. It is a light freakish blue with silver speckles going through it. It kinda leaves a silver-ish shine to it

I happened to have a miniature one of this polish i feel like ill be using this polish alot that i would need a full sized one. It's a really gorgeous colour and it dries fast too because it is quite a thin polish.

I can't seem to find a bad quality with this polish and is one of my all time favourite polishes ever, so i highly recommend it. If you have tried it yet, GET IT. My nails a quite short here but that was about the time my nails broke

Anyways hope you enjoyed this post :)

Thursday, 6 September 2012

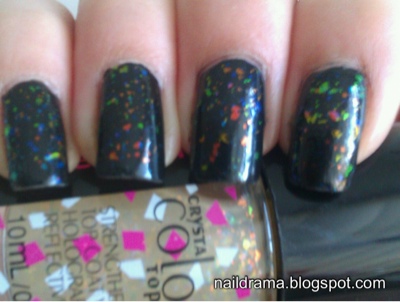
Australis- Specktacular

Hey everyone! Today I've had an amazing day which mostly consisted in smiling and laughing and no I wasn't high. I didn't really plan on posting anything today but with my positive day I couldn't help but to come and post :) today I have a swatch for Australis Specktacular which is a holographic flakie topcoat. I apologize in advance as the pictures aren't the best. I may have to do this post again sometime but for now this will have to do. Looks like lately my camera isn't working quite well, is this an oppurturnity to buy a new one? Although I've already spent a lot on polish this month.
This is the only photo taken in the sun. You can see how gorgeous the flakes look. Multi coloured flakes everywhere!!!! I have a black base polish underneath but for a weird reason it's coming off really dark navy or maybe a black with a blue undertone. It's actually Rimmel London Black Out.

This photo And the ones below are taken in a room with the lights on. This polish works really well with dark colours and it isn't that noticable with light colours, so I highly recommend using a dark colour underneath. 

When you look at the polish from this angle, most or all of the flakes look green. The amazing effects of holographic flakes! I've used two coats to achieve the look as well as two black polish coats underneath. 

This polish dries smooth so you don't need a topcoat and well it's also a topcoat anyways. This is available for $8.95 at Priceline, Target and I believe Big W.  I purchased this during a sale which was two Australis polishes for $10 which I knew I couldn't pass on, an extra polish for only $1.  I also got Fairybread and will do swatches soon.

Tuesday, 4 September 2012

Easy Glitter Removal

I hope this post is as exciting to you as it is to me. Lately people have been talking about nail soakers and how they might be great use for removing glitter nail polish. Personally Im not 100% liking the foil method as it doesn't remove all the polish and I always find myself still scrubbing the polish off my nails.  So I decided to put this to the test and see how well it works. Look below for steps on how to do this

You will need nail soakers. I purchased mine from Ebay for only $2.81. Just simply type nail soakers in eBay and you will find heaps ranged around $2-$4. A link to the nail soakers I purchased can be found Here. I recommend rubbing cuticle oil on your cuticles and nails.

Then pour some nail polish remover or pure acetone into the nail soaker up to the clear part. I never use acetone or nail polish remover with acetone but for this experiment I decided to use pure acetone. I know acetone is bad but just to make sure this works I decided to use acetone. That's where the cuticle oil comes handy.

Insert you fingers into the nail soakers. My pack came with 10 but I only ended up using 5 as I only did one hand at a time. I left my fingers in the nail soakers for only 2 minutes and the polish was gone completely. Don't throw the acetone or nail polish remover away, use it for your other hand.
As you can see the acetone removed all the glitter and polish. Just the smallest amount is seen on my index finger and that is only two tiny dots of glitter which was easily removed with acetone-free nail polish remover. On my nails I had Chi Chi- My Bad which is black polish filled with lots of glitter. The reason for rubbing cuticle oil on your cuticles and nails is to stop the nail polish remover from drying your cuticles/nails. After your done rub more cuticle oil on your cuticles/nails

As you can see the glitter sinks to the bottom and the acetone has a slight colour change. You can choose to throw away the acetone or keep it for another time. If your using glitter only polish than keeping it will be fine as it won't be coloured or look gross but if your polish has a base colour than I recommend throwing the acetone or nail polish remover away. I don't know how successful nail polish remover is but I'm sure it will work. You may just have to leave it on your nails longer

What did you think? Did you like this experiment?
Comment below with your opinion and tell me whether this has helped or not


Sunday, 2 September 2012

Chi Chi - My Bad

Hey guys. I'm so excited to show you this polish. Today I went shopping and shopping wouldn't be shopping if I didn't buy polish. I bought a few but you will probably see them later on. Here I have an Australian brand called Chi Chi which I love the name. Chi Chi My Bad is a black base polish with silver glitter that changes colour from different angles as well as orange-red flakes. The black base isn't a pure black as it has hints of brown in it. 
Here you can see the bottle. Right in the middle is the orange-red flakes that a shining. You can also see random sparks of colour here and there from the silver glitter.
This picture above is taken with no flash or being in the sun. This was just taken in a room with lights on.  The glitter isn't shining a rainbow effect in the picture so I definitely recommend seeing this in person. The silver glitter is more like holographic glitter.
As you can see the polish isn't pure black and that hint of brown is slightly noticeable. This polish is even more gorgeous in person. My pictures aren't doing this polish justice. It's more black in person but it does have a hint of brown whereas in the picture it's showing a little too much brown.
Close up of the bottle. This polish is available at Target and Myer stores for $5. This polish is only available in Australia so if you don't live in Australia then you won't have access to this polish, unless you swap with someone or something of that kind.
Formula was great and only needed 2 coats to achieve this look. I recommend topcoat to smooth out the polish however I didn't use topcoat as I will be changing this polish soon

OPI- Kiss Me On my Tulips

Hello guys. Today I have a swatch for OPI Kiss Me On My Tulips. Kiss Me On My Tulips is a bright pink. My camera has done the honors of making it slightly more brighter than its supposed to be. Overall it's a great colour and the formula was great. No clean up was needed. I only had this on my nails for one day as I felt that it was a little too bright, and slightly inappropriate as I had a presentation that day. I usually wear any polish whenever I want without caring what people think but this time I had a presentation and bright nails weren't the way to go.
This polish is from the Holland collection. I have to say that I really like the OPI brushes even though they are bigger than other brands. I just find that it works well with me and clean up isn't needed. My nail beds are small which makes the OPI brushes great for me as they tend to cover my nail.
This polish had a great drying time. I literally can't think of anything bad about this polish. Being a little bright doesn't bother me but I just had this on the wrong day so that's why I had to remove it. I'm really excited about using and swatching I Have A Herring Problem as I really love that colour.

What's your favourite colour from the Holland Collection?

Saturday, 1 September 2012

Giveaway winner

Ss it's finally time to announce the winner. I wasn't expecting this many entries so I was really amazed. I was also planning to have another giveaway when I hit 250 followers but I even went beyond that many followers. I will still have another giveaway but in a whiles time. I just want to thank everyone who entered. There were some entries that didn't count because they didn't follow the rules so I apoligize but those entries don't count(there was about 7). Some people also entered the contest even when it was closed so those don't count either. I had four entries this morning when clearly the last day was yesterday. Enough about me rambling and now to the great and exciting news.

For those who are unaware of what giveaway I'm talking about Click Here. Sadly there can only be one winner.

The winner is.......... Samantha Andrews

Please respond to my email within 48 hours otherwise a new winner will be picked. Everyone else stay tuned in case I have to pick a new winner. Hope to see you all again on my blog