Tuesday, 13 May 2014

Sally Hansen- Mint Sorbet

So today i have another swatch. I've been eyeing this particular nail polish for ages. So i went out last week and bought it. This is Mint Sorbet by Sally Hansen.
I will admit that I've been loving the Sally Hansen Xtreme Wear polishes because they have great formula. This was also the case for Mint Sorbet. It was easy to use, applying was a breeze, great dry time and the consistency of the polish was awesome.
This whole manicure took about 7 minutes. If you've been following me for a little while, you'll know that i love my green nail polishes and the colour of this is amazing. It's already become a favourite of mine.
I also like the fact that the nail polish doesnt look streaky or messy on my nails, which can be a real eye sore. If you haven't tried this yet, give it a go.
What do you think about this colour? What is your opinion on Sally Hansen polishes?

Monday, 12 May 2014

Melodi Nail Art Sticker

Hey guys!!!! Today I'm going to be showing you guys the Nail Art Stickers from Melodi. These were sent to me for reviewing purposes by Born Pretty Store
These particular Nail Art Stickers can be found Here. Dont forget to use the Coupon Code CVBQ10 to get a discount.
So this is how the stickers look. You get 14 stickers, which vary in sizes.
I will admit that i am not good at applying Nail Art Stickers, but i think i did a decent job with these. I did apply topcoat to make them last longer.
I practically used all the small stickers because i have small nail beds but they fit quite well. I also liked the fact that they were not sticky, so if i made a mistake i could peel it off and apply again as long as i didn't cress or ruin them.
Here is a close up of my thumb so you can see how they look.
Overall I'm impressed. Most Nail Art Stickers no matter what brand only seem to last 3-7 days. This in particular lasted 5 days and then began showing wear and tear. I do recommend top coat to make them last longer
Everyone who say my nails couldn't tell i had nail stickers on. They asked me several times how i did my nails like this and some people even thought i had fake nails.
Applying was a breeze, I've had difficulties with nail stickers before but that wasnt the case with these.
So if you want to purchase these click here , or head over to the Born Pretty Store to look at there other nail art products. Don't forget to use the code CVBQ10 for a discount.
It took about 5-6 minutes to apply these. This is good if you are in a rush or you don't want to wait for your nail polish to dry. Definitely recommend these
This last picture shows you how they looked at the beginning of day 5. I had a shower on day 5 and they began to show wear and tear. They possibly could last longer because the wear and tear wasnt very noticeable. So keep that in mind.

What do you think?

These products were sent to me for reviewing purposes. In no way does it affect my review/opinion. Like always my reviews are 100% honest opinion

Sunday, 11 May 2014

Max Factor - Fantasy Fire

Hey guys, i know i haven't posted much later. I've been absent for a long time, and it is because I'm in Uni now which is taking up alot of my time. I will however try to post more often. Ok enough about that, you're all here to see swatches.
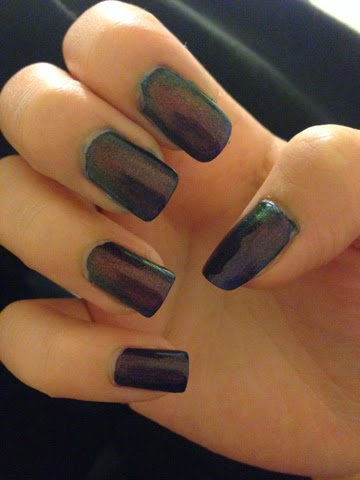
Today i have a swatch of Max Factor Fantasy Fire, which is a gorgeous polish. The polish seems to be a dark blue/purple base with red shine going through it. I'm bad at describing polishes so you'll just have to look at the pictures. The first few photos i forgot clean up, so please ignore that. I will say that the polish itself is sheer, and will require alot of coats before becoming opaque. Which is why I used China Glaze Calypso Blue underneath as the base. These two really go well together. So if you want this look, you both polishes but any dark blue polish will work nicely.
Just take a look at that bottle. It's so pretty, i was in awe when i first saw it in store.
I only needed to use one coat of Max Factor Fantasy fire because i used China Glaze Calypso Blue underneath and i used 2 coats of that however you only really need 1 coat.
If you are to use Fantasy Fire all on its own, which i don't really recommend you'll need several coats. With 5 coats it was still sheer. It is a small bottle so it will be used up before you know it. Using a base colour will help make the polish last longer. You can see with the combo i used that the polish on my nails doesn't look different then the bottle.
Here is what the polish looks like in a dark place. The red doesn't shine as much but is still noticeable and still very pretty.
What do you think? Does it look amazing? Is better better than a regular polish?
I hope you enjoyed this post. Ill talk to you guys later :)

Friday, 20 December 2013

Sally Hansen Sugar Coat- Sour Apple

So today i have another swatch. It's my first time trying out textured polish and I'm surprised I haven't tried it before. I've always been very fond of smooth finishes but after trying this, i could totally try more. The polish I'm swatching today is Sally Hansen Sugar Coat in the colour Sour Apple.
The colour of Sour Apple is gorgeous. It's really already became a favourite of mine. The formula was great. I was worried that being a textured polish, it would be hard to apply but applying was a breeze. In the photos i have 2 coats but if you applied a good even coat, you could definitely get away with only 1 coat. Drying time was also good, it dried fairly quickly within 2-4 minutes. The texture of the polish is also great. As you can see in the pictures that the texture is very noticeable and definitely looks textured.
Another thing that impressed me is that it stayed on for very long. Usual polishes will tend to show signs of wear and tear on the third day or so when no top coat is applied. If you take a shower, normal polishes will show signs of peeling, if not completely peel off. With the Sugar Coats there was no sign of wear and tear or peeling even though i wore it for an entire week and with numerous showers taken the polish still looked brand new.
Impressed...Yes very. I'm going to have to buy all the other Sugar Coats by Sally Hansen. 
What do you think? Do you like Textured Polish?

Tuesday, 3 December 2013

Splatter Nail Art

So I'm pretty sure you all have heard of the splatter nail art. As much as I'd like to try it, it seems like too much work. So i kind of cheated and created my own splatter nail art but with stamping. I picked a bunch of different coloured polishes and stamped it over Sally Hansen White On. Believe it or not but i had tried 4 white polishes i owned which had all hardened and they were so hard to apply. I ended up giving up and went shopping for white polish. So after i found a white polish. I attempted this design. Yep i went and bought polish just for this nail art.
The splatter design is from the image plate B38 from Cheeky. The nail art looks like a bunch of different colours of paint are splattered all over my nails. I'm so impressed with this design as it turned out so well and its not as messy as actually splattering nail polish all over your nails. 
I think my most favourite nails are my ring finger and my middle finger. The colour combo for those look really nice. The best thing is you can use any colours you want or even have certain colours to match a theme or even your outfit.
You have alot of control with this nail art. You can select different colours, which position to place them, whether to overlap the paint splatters or not. You can even use red to make it look like blood, kind of a death scene nail art which has also been very popular. To make it look realistic i overlapped some of the splatters. You can make the splatters into anything. In my case, they are paint splattered onto my nails.
So what do you think.... Let me know in the comments below

Saturday, 30 November 2013

Barbed Wire Nail Art

So if you guys have been checking out my blog, you will know that i haven't been doing much nail art. So keeping that in mind i decided to do some nail art. I haven't used my stamping image plates in a while so i thought LETS STAMP!!!!!!

Products i used:
-BYS nail polish in Kung Fu Blue
- Konad special polish in Black
-Bundle Monster image plate BM323

That's how simple this design is. It only requires 3 things and you're good to go. Of course you need a stamper and scraper but that's pretty logical so i didn't add that to the list. This nail art looks so much better in person, i swear. The design is Barbed Wire which i thought was cute.
It's quite simple but I've received so many compliments. In fact today when i walked into Priceline, yep to buy more nail polish. The lady who worked there said she loved my nails so much, she actually even guessed that i went into Priceline to buy polish. As soon as i walked in she was like " you're here to buy polish, right?" Bahaha, i nodded and she was like " I saw your nails and i guessed" 
I'm very pleased with how this turned out and sometimes even simple designs look really nice. Oh and I've been eyeing the new bundle monster holiday set and the CYO set, every year i get them when they are released but i just found out about them this month. Why am i so slow with trends and new stuff this year. So maybe you will see future posts with those image plates.

Anyways hope you enjoy this post.... Tell me what you thought. Do you like the barbed wire nail art?

Monday, 25 November 2013

Essie- Case Study

So this is the first time I'm swatching Essie polish on my blog. I like Essie polishes so its kind of weird that i haven't swatched them before. Anyways aside from my rambling today I'm gonna be talking about Essie Case Study. Case Study is a creamish brown polish. If you guys don't already know, I'm a sucker for nude, tan, beige and creamish colours so when I saw this in the store i knew i had to have it. 
The photos show 2 coats but this is opaque with one coat if you do a generous coat. However knowing me, i had to add the second coat. Only downside to this polish is that it is so much darker on your nails then in the bottle. Don't get me wrong i love the colour on my nails but i initially picked it up because i loved the colour in the bottle and if i had to pick which I liked better, it would have to be the colour in the bottle then on the nail. I still love the colour on the nail though but not as much as in the bottle. In fact if you look at pictures below(not the top photo cause you can't tell) you can tell the difference between the polish that is in the bottle and on your nail. I do have to say that you can notice a bigger difference in person then the pictures.
Okay enough said about the colour. Applying was a breeze and no clean up which I love. Drying was good, not great but definitely better then alot of polishes and by good i mean that once you painted both your hands, you had to wait 2-3 minutes for the next coat which is not bad. I usually say great drying time to polishes that are done by the time you finish your both hands that you can go straight away with a second coat. Still pretty impressive. The formula was also great. I definitely see myself using Essie Case Study in the future.
What's your favourite Essie polish? Have you used Case Study?
Let me know your opinions and thoughts in the comments below